FTP on Chrome OS
If you’re anything like me and you’ve been searching high and low for a reliable FTP solution on Chromebooks, this is the short and sweet article for you to read.
I’ll save you the fluff as I try to point you in the right direction to get a reliable FileZilla replacement for your Chromebook — Linux development endeavours. Whether you’re coming from Mac OS or Windows, FileZilla was no doubt the free go-to FTP program. Unfortunately, there is no .deb source code that works on Chrome OS as I’ve experienced. The good news is that a great FTP solution is already built into the default Files app on Chrome OS.
Launching the FTP client in the Files App
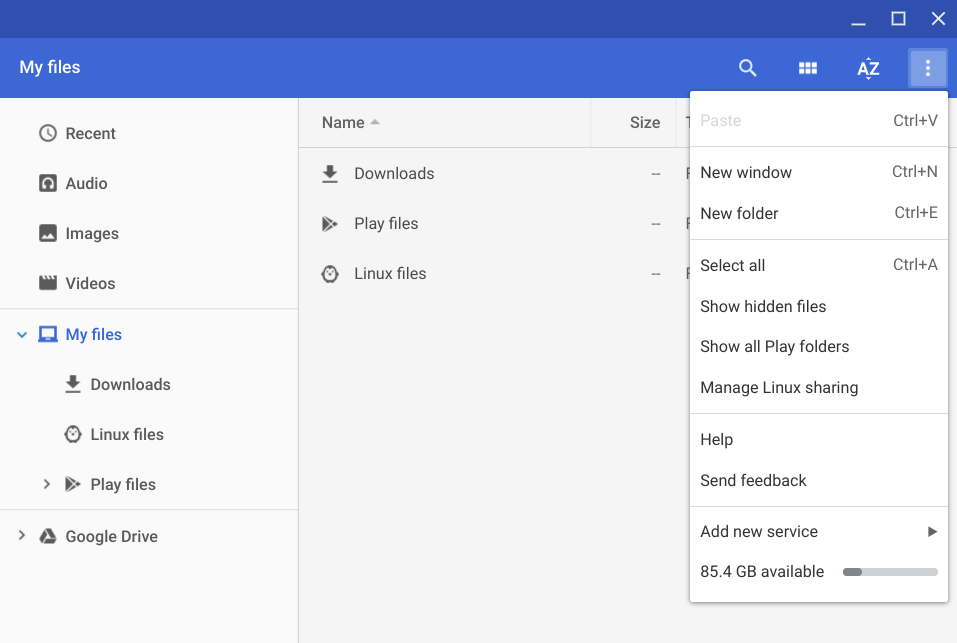
- Access the drop-down menu on the top right of the files app on Chrome OS.
- Near the bottom of this drop-down menu, click on Add new service.
- You should be greeted with a list of programs to install. The one that i’m using and would recommend is captured in the next screen shot.

4. Shared network folder (SFTP) is the chrome extension to download. As you may notice, the image attached is not the same thing you’ll see in the files app. That’t because I grabbed the screenshot from the chrome web store, which is pretty much the same thing. If you prefer, you can also install the extension from here: https://chrome.google.com/webstore/detail/shared-network-folder-sft/gbheifiifcfekkamhepkeogobihicgmn
Configuring the FTP client
Once the installation goes well (not that there should be any issues), the FTP client should launch and allow you to enter the server details as seen below.

At this point, you may want to log into your domain hosting account and retrieve your FTP credentials.
- Use your server’s IP address as the Server name.
- Leave the Port number 22 as is.
- The Mount path can be left as the root directory, however, It’ll be so much easier and faster if you navigate to the public_html folder (as this is where most of your live website files would live anyway).
- Ticking the Display name box is optional. This is just the display name for this connection that would be shown in the side panel of the files app.
- Both the Username and Password will be retrieved from your domain host cPanel FTP configuration settings area. As you guessed, the Authentication type should be left as Password.
Please note that SSH would need to be turned on.
6. At this point I was able to setup the FTP correctly and establish connection, however I was unable to upload any files to my web server due to SSH being turned off. In my case, I had to contact GoDaddy support to turn on SSH for me. Once they did, everything worked seamlessly to transfer files to my web server.
And that’s it! Simple and easy FTP on your Chrome OS — Linux development environment. I hope this article helps someone. If it did please let me know.